Chinese Flower Painting |
|||||||||||||||||
Chrysanthemum Watercolor Art LessonChrysanthemums and flowers are a popular choice for the watercolor artist. Not only do they cry out for bright varied colors, but happy accidents and softened edges are perfectly suited to watercolor painting. In this watercolor lesson, many experimental techniques are applied in order to maximise the spontaneity of creating accidents, whilst maintaing control over the finished painting. These techniques include blowing the paint, moving the paint around with fingers, allowing the paint to flow down the paper and even painting in an ambidextrous fashion (not recommended for most!) The chrysanthemum is native to Asia, with 40 species, but were first cultivated in China as a herb in the 15th century BC. In Chinese art, there is reference to the four gentleman, which includes: plum blossom, bamboo, orchid and the chrysanthemum. They have appeared in Chinese painting since the time of the Song Dynasty, starting in the 10th century. The artist, Lian Quan Zhen, went from family physician in China to Chinese watercolor artist after immigrating to the US and studying art at the University of California, Berkeley. He has written several books on the subject, published by North Light Books alongside creating DVD's. 
Chrysanthemum (watercolor) 18"x24" Materials: use watercolor painting materials listed at the bottom of the Workshops page on this web site. Preparation before painting: Put the three primary pigments into three small dishes separately and dilute them with water to make color liquids about medium tone. You need approximately 7 teaspoons of color liquid from each color to finish this painting. Step 1: Sketch the composition on the watercolor paper with pencil. Use masking tape to attach the perimeters of the paper on a firm board. 
Next, use masking fluid to cover the three flowers at the focus point. Step 2: Pour the Yellow and Red liquids on the upper left of the painting and use mouth to blow them in forming the shapes of the flowers. 
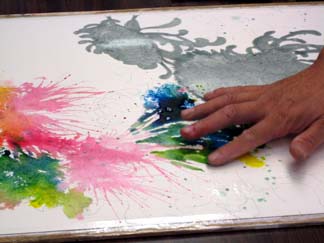
Step 3: Pour the Yellow and Blue liquids next to the flowers. Use fingers to guide and blend the colors. Avoid over-mixing the liquids. 
Step 4: Pour more color liquids on the painting and paint with similar method as step 3 using fingers and large brushes. Tilt the upper edge of the board about 4 inches higher so that the liquids can flow down toward the bottom to create the stems. 
Step 5: Here you can see the whole painting after pouring and blending. While the painting is wet, use a large brush to mix thick and soft Blue and Red pigments into dark Blue to paint around the flowers. 
Step 6: Wait until the painting completely dry. Use masking tape to lift the masking on the three flowers. 
Step 7: Use a pencil to sketch the details of the flowers again if the original sketching disappears. Take two mid-size round brushes to paint the flowers, one for apply colors and the other for blending. 
Step 8: After for the first layer of the colors dry, use two small size brushes to defined the petals, one for apply colors and the other for blending. To mix dark red use the soft and thick Red and a little Blue. To mix orange use the Red and Yellow. 
Step 9: When defining the petals, remember not to paint every one of them with same intensity of colors, nor same level of details. 
Step 10: At the upper left of the painting, use a pencil to draw the shapes of flowers, improvising from the effects of the color pouring and blowing. Then use negative painting technique to define the petals. 

Step 11: Repeat the techniques on step 10 to call out the flowers at the lower left of the painting. 

Step 12: After finishing the flowers, paint the leaves and stems starting from the focus point area. Use two brushes to define the objects with negative painting technique. Put more dark value colors mixing from the Blue and Red around the light flowers. 
Step 13: Paint more detail backgrounds around the focus point area. Do not define all the edges of the flowers in the same way. For those located away from the focus point, such as the flowers at the upper and lower left, leave some undefined areas. 
Step 14: At the top of the painting, just briefly defined the buds. Leave the watermark at right and the orangey color in themiddle top alone, as suggestions of flowers. 
Step 15: Add a reddish dragonfly on top of the painting. It gives more life to the flowers. On top of this page is the finished painting. 
The watercolor painting demonstration on this page shows Lian Zhen's floral painting techniques.You can see more watercolor and Chinese painting demos with similar and different methods on variety subjects from three of his books published by North Light: Chinese Painting Techniques for Exquisite Watercolors, Chinese Watercolor Painting Techniques - Painting Animals and Chinese Watercolor Techniques for Exquisite Flowers, as well as on his painting demo DVDs. To purchase the books and painting demo DVDs, click Book & Painting Demo DVDs You can also learn the techniques from Lian Zhen's workshops, click Workshops Visit: Lian Zhen
|
|||||||||||||||||
Watercolor Lessons
|


