A Method of Drawing Celtic Knotwork - WeavesCeltic Art Lesson |
||||||||||||||||
Part 2 of 2After defining the two-chords for all the joined sections, I joined the last two open ends on each side. I created an extra loop near the meerkat’s feet to fill the space roughly as much as it is for the rest of the design. 

At this point, the meerkats are technically a complete design, and I could have stopped here. However, I wanted to add another chord element weaving through the two-chord design. I considered extending the meerkat’s tail’s and making them the knot design, but I wanted the final design for this tutorial to be something less difficult than that. Weaving the two tails would have created two open-ended chords, which can require a great deal of modification in order for the final knot to have integrity. Also, I would need to worry that I did not create any extraneous chords which did not belong to either tail. By creating the additional weave out of a seperate, continuous chord element, I could guarantee its integrity, and remove all worry about how many seperate chord elements I created. I started out with two chords weaving around each other through one of the open corridors left by the two-chord design. 
I then took parts of the weave, broke them and drew them across the two-chord design. 

As before, I tried to keep the chords even and smooth. I continued in this fashion, breaking the simple weave and sending the lines over the two-chord design, but the further I got the more of the original simplicity I lost and the more muddled the overall appearance became. To put it bluntly, I didn’t like how the design was turning out. So, I went to the left side of the design and tried again. After the mess of the first attempt, I decided to keep the crossings to a minimum and retain the simpler motif of two chords weaving over one another. 
I decided I liked the new design better, erased the first design and completed the weave over the entire piece using the section shown here as my style guide. As with the two-chord element, I mirrored the design on the left and right sides of the circle. This is the final design sketch. I tried to keep the simple weave of two lines, and in the corners created by the other elements, I placed triscaleons if possible. 
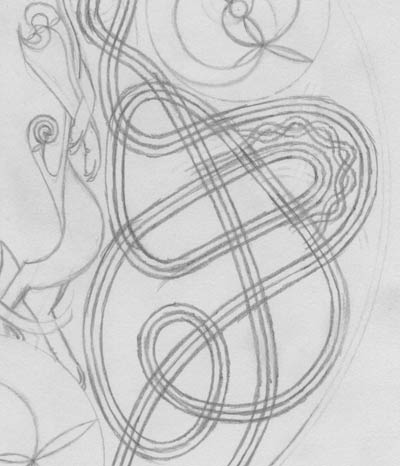
I think it bears mentioning that as I created the design, I was continually moving the lines slightly to enhance the curves. It is customary for me to create chord fragments and join them later, so often the curve of the fragments does not match the final joint. These locations must be modified slightly so that the curves are smooth. If you look closely at this final sketch, you will see that there are portions of the chords that still do not have a smooth flow to them. Some of these I will correct when finalizing the weave, and others I will fix on the lightbox. I strongly recommend that until you are completely comfortable with knotwork, you fix all of the curves in pencil before proceeding to inking. 
This is a small portion of the design with the weave worked in the pencil. In a two-chord weave, the centerline is completely continuous. It has NO BREAKS. Even though these continuous chords are guaranteed to have integrity, it is easy to make mistakes on the lightbox. I strongly recommend erasing the unnecessary lines and resolving the weave in pencil before inking so there is no guesswork once you cannot erase your mistakes. I made one unnecessary crossing line when inking this design, which is visible on the final, inked piece. These illustrations show how most of the lines were moved in the final inking. The red is the final sketch, and the black is the final inking. 


Visit Sidney Eileen's Website Tutorial is copyright of Sidney Eileen
|
||||||||||||||||
Drawing Lessons
Site Navigation |


