GRAND CANYON NORTH RIMLandscape Oil Painting Demonstration |
||||||||||||||||
The Grand Canyon - Part 2 of 212/11/03 
I've finished building the masonite painting panels and today I applied the first coat of black paint on the edges. I'll be adding several coats on the edges and sanding the front surface. 01/22/04 
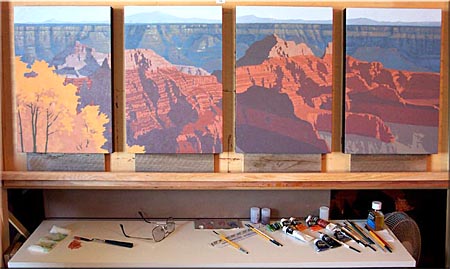
With Christmas, New Years and major web site changes I needed to make, progress has been slow. But here it is, the finished "underpainting" for this four panel mural. You'll notice similarities with this same stage on the practice painting with greater attention paid to some details and the big blends I explained previously. The value of doing a practice piece is now clear, it provides the "roadmap" for this study. In a way this is one big "number painting" at this point, the effort remaining disciplined labor with attention focused on two things: Covering the white background and maintaining the drawing. Now you can make comparisons between my palette of colors and the posterized photo at the top of this page. I indicated at the beginning that my photo was too bright and too blue. The drawing was my biggest concern and the only reason that I'd work from a photo anyway. This is a portrait of a specific place and the photo serves as a blueprint for anatomy. But the color and the light are all mine! This is a picture of the painting on my newly remodeled home studio easel. 
And now, dear reader, this is the payoff for having taken the time to invest in a preliminary painting. Here you can see where I kept an actual paint swatch from each of the colors I used in the detail work of the first painting. I applied these to a piece of tin foil as I worked on the first piece. These will be needed as I proceed. 02/02/04 
As it is with most landscapes I paint, I work from back to front, which almost always amounts to be the same as from top to bottom. And for those who watch me on a regular basis, you'll recognize that I paint from dark to light with few exceptions. I love the opacity and the effect created by scrumbling over the darker color and leaving small "holidays" that show through. 02/07/04 
Working in very subtle value and color changes I am blocking in the shapes of the far away north face of the south rim cliffs, based upon my photo reference. You can see that my underpainting is a little more blue than my new work. This is intentional as I am dry brushing the new color and I want the dull blue in the shadows to show through, it increases the feeling of atmosphere and distance. Layer over layer I work. Lecture Notes
Although very subtle, there are large basic shapes to keep in mind while working on this far canyon wall. The light is still late afternoon coming from the right, or the west. This simplicity must be represented in execution even though very soft. Photographs often do not capture this essence and it is incumbent upon the artist to see it. As I work I'll be looking for this reality. 02/10/04 
At this point the sky, the mountains and most of the far cliff wall have been repainted. The photos above indicate the steps and how much is changed. The mountains are lighter and therefore further away in the atmosphere. In reality it's about twelve miles to the south rim and about 75 miles to the Peaks. 02/15/04 
Here's a photo of panel two after the most recent work session. As the small geometric drawing shows, the walls of the hermit shale, as well as most of the canyon, is a series of cliffs and ledges, each varying according to rock type and erosional characteristic. This first pass over the surface anatomy serves only to apply a detail value that represents the side wall cliffs which are lighter than the upper surfaces in the canyon. This is part of the anomaly of painting this place. I've shown you how I keep basic geometrical shapes in my mind as I work on these complicated shapes. The artist must always know where he is within the picture. These basic shapes and elementary blends are my method of understanding what the source photo doesn't explain.  02/16/04 
In today's session I mixed some colors, four related values, that I carefully dry brushed over the background south rim cliffs. The background had become dry enough for this next step. Remaining consistent with the former process I added a color that appears redish ONLY when applied on top of the dry background paint. Allowing the "blue" color to show through in the shadows and the crevasses I modeled new surfaces with new shadows and forms. This is all VERY subtle work, but important. It is the final touch that "keys" the background with the foreground color, making it all hang together as a whole. After all, it IS the same eroded soil just separated by about twelve miles of haze and atmosphere. 02/17/04 
The purpose of today's session was to begin developing the upper surfaces of the many small ledges on the foreground butte. There's much more work done than shows in this photo. But the logic behind what you can see is this. After the long monsoon season of late summer there is a lot of green foliage on the upper surfaces of the higher portions of the canyon. Pinon Pine and Juniper grows in abundance. The more horizontal the surface the more growth. Hence you can see where I've painted some greenish surfaces. Although more extreme than the final color it serves to guide me as I work. It also immediately makes the scene organic. 02/20/04 
I am finally to the point of the painting where there is some visual gratification as I work. The Hermit Shale is taking shape. My intention in this session was to further develop the contrast between the side walls where the afternoon light is hitting and the foliage covered upper surfaces. I've also added the first light tone on the upper Coconino Sandstone buttes. As it was on the practice painting I'm doing work ONLY in the light areas. 02/21/04 
In this session I further develop the western sunlight and how it creates a sheen on the vertical walls of the foreground butte. The hotter brick red under coat is allowed to show through where it matters as the more organic tones are painted over in small pointillism patterns. All of this brittleness creates light. 02/21/04 
This picture will show you the fun I'm having developing the detail on these sunlit surfaces. I have the values and the late summer / Fall colors about where I want them now. You can see that I've built the details well beyond the level of my practice painting. Without that exercise I would never be able to handle all of this. It is a very complex subject. 02/21/04 
In this photo you can see my development of some of the shadow areas. As it was in the practice painting, within the shadow area I play down the color and value contrast. In these areas where there is an absence of "light," I leave out a lot of color fidelity and detail on purpose. I paint with a larger brush than usual and I flatten the detail. All colors mixed are duller than real life and a little "bluer." The contrast makes the portion in sunlight look more brittle and on a higher octave. 02/29/04 
At this point the butte is about 85% finished. I will spend the next week working on the aspen trees and doing highlight touch up where I discern it's needed. 03/04/04 
In today's painting session I blocked in the aspen trees. My intention here is to paint the colors you'll see later between the cracks and spaces of the final leaves. 03/08/04 
Today I continued to work on the aspen tree group on the first panel. Step by step. 03/10/04 
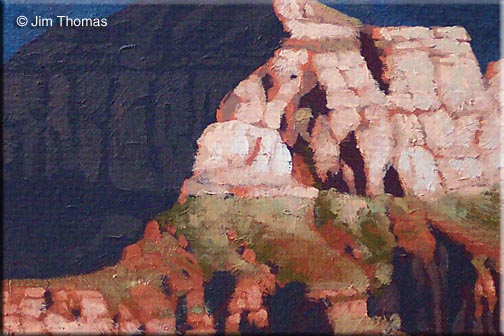
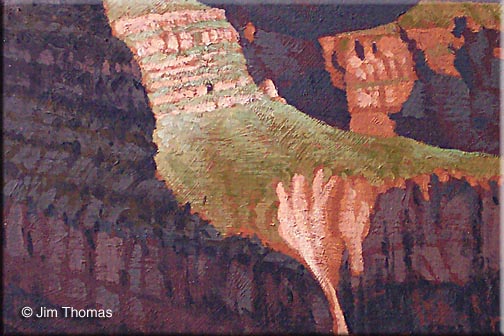
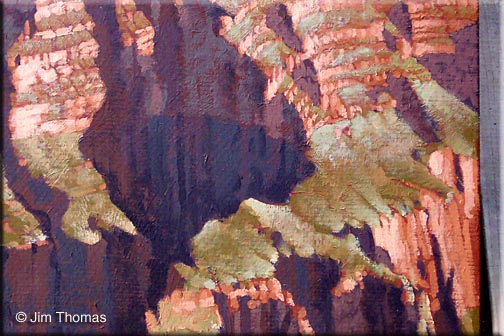
Today, five months to the day from the day I started, I applied the final details to this wonderful project! For the artistically curious! In response to inquiries for seeing greater detail on this painting, I've installed these extreme close ups of the finished painting. I know that this will have meaning for other painters as well as for my various potential collectors. Enjoy!
Visit JH Thomas' Website Tutorial is copyright of JH Thomas
|
||||||||||||||||
Oil Painting Lessons
Art Lessons |


