How to Draw a DogFree Pencil Art Lesson |
|||||||||||||||||

Follow along with me as I demonstrate how to draw dogs and other furry critters in graphite. In this piece I have elected not to add a background, so my concentration will be on the main subject. The completed drawing will be 8x8" in size, drawn with a .7mm mechanical pencil with HB lead on smooth Bristol paper. 
This is the reference photo that was provided for my drawing of "Sadie."
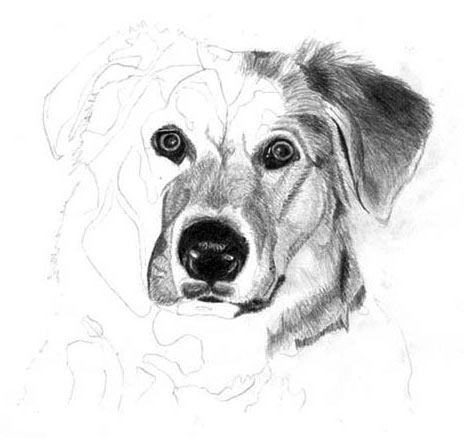
I like to start with my darkest values first, which in this case, is the nose, eyes, left ear and some of the gums. The eyes are VERY important to the finished drawing and I like to complete them early on. I like to work from the right to the left and top to bottom. I use a piece of paper under my hand to prevent smearing the areas I have completed and the oils in my skin from contacting the paper. I use lines to create the look of fur. It is important to pay attention to the direction that the hair lies and make your pencil strokes in the same direction. The length of hair must also be observed. Short hair uses short strokes; longer hair uses longer strokes. The width of the hair can also vary. I use the flattened side of my pencil to make course hairs and the very tip for fine hairs.
Contrast is what gives any drawing a three dimensional look. By using the full range of tones, from white to black, it creates an impression of dimension. As I begin to do more work on the face I observe the areas in the picture that should be lightest, darkest, and the mid-tones.
When first learning to draw in pencil, it is sometimes easier for an artist to take the reference picture into a photo editing program and convert it to grayscale. Another trick is to squint your eyes, which helps reduce the detail that you can see and helps visually pull out the major shades in a picture rather than all the little details.
Sadie's face continues to take shape. Her personality that is reflected in the photograph is beginning to pop through in the drawing. The drawing of Sadie is complete. The lower part of her chest is not as in focus in the picture as her face. I blur her chest a bit with a facial tissue. I come in with a kneaded gum eraser and pick up some highlights and clean up smudges. The last things I do are to add small details including her whiskers and my signature. I did take some artistic liberty to remove the strap of the collar and tag. I also made it look as if she is sitting, where in the photo she is lying down.
Here is a zoomed in shot that shows more specific details of my pencil strokes and shading. 
Visit Cathy Sheeter
|
|||||||||||||||||
Drawing Lessons
Site Navigation |
 First I lightly sketch an accurate line drawing (this has been significantly darkened to be easier to see). I draw in lines to indicate shade changes and major body parts (eyes, nose, etc.) I prefer a fairly detailed value sketch for accuracy. The value sketch can be attained in whatever your preferred method is: a grid, freehand, tracing, etc. I generally use the grid method to get my initial value sketch. I find it allows me good accuracy and enables me to enlarge my sketch to any size from even a small photo.


