Colored Pencil Tools and Techniques for the Wax and Oil Based Colored PencilBlending with Colored Pencils - Part 1 of 2 |
|||||||||||||||||
Blending Supplies
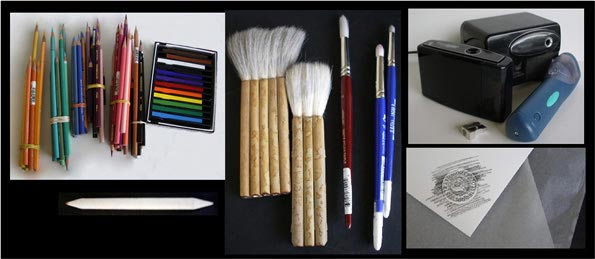
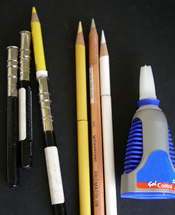
 Colored Pencils (wax or oil based) – Boxed sets of colored pencils are convenient but buying colors individually gives you control of the colors you use. The more colors you have in your palette the more freedom of choice you have in your artwork. Quality colored pencil brands are Prismacolor Colored Pencils, Faber Castell Polychromos Colored pencils is an oil based colored pencil and is workable like wax based colored pencils, & Derwint, etc. Art Sticks – Prismacolor offers art sticks that are merely colored pencil pigments formed into a stick format rather than being formed to fit in a wooden shaft. These are useful when amassing color for stains and rough overlays without wasting pencils with constant sharpening. Extend the usefulness of pencils stubs… Super Glue Gel or Crazy glue Gel – Another means to extend the use of your pencil stub is to glue a new unsharpened pencil to the bottom of your pencil stub. Be sure the bond is true or you may lose your stub within your sharpener. If the stub is stuck in the sharpener you will need to break up the stub using an awl or other sharp metal point to break the stuck piece of pencil into small peices within the sharpener. Shake out the broken pieces. BrushesA large soft mop brush. (A large soft mop brush is needed for brushing off erasures and pencil dust) (Hake Brushes or an inexpensive mop brush I suggest a one inch Multi-Stem Hake Brush. You can use a large, clean cosmetic brush. Used for solvent or mixed media applications. Fabric Dye Brush or Round Scrubber - Sold as a craft brush not usually found in art stores – They have very short tough bristles with a rounded top. Round watercolor brus or white round acrylic watercolor brush. PapersSheets of Strathmore 500 series, 100% cotton acid free Bristol board, vellum or cold press type surface (vellum has a rough texture as opposed to a smooth or slick surface). Individual sheets come in 2 ply, 3 ply, 4 ply, or 5 ply thicknesses. Check the texture of the board and corner embossment to see if the sheet you are buying meets the specifications mentioned. The 23″x 29" sheets can be cut to fit the size you want your image to be. I DO NOT recommend Bristol board tablets. The Strathmore 500 series is 100% cotton and is takes a lot of abuse from erasing, sanding and scraping for a variety of techniques that require a forgiving surface. The color sits on top of the paper so it can be easily manipulated. Softer papers such as BFK, or watercolor papers are absorbent and soak up color which makes erasing and solvent manipulation difficult for the techniques I use for making colored pencil paintings. Tracing Paper -- I use tracing paper for problem solving and designing and impressed line technique. Sheets of toned charcoal paper if you wish to use a colored background. Papers can be cut and put into your personalized sketchbook if you wish. Sketch Book Commercial Sketch Pads are not recommended. Blending TechniquesOverlaying(Click Image For Larger View) 
Applying colored pencil strokes to create a color blend. This process is much the same as mixing colors on a painter’s palette. But colored pencil hues are mixed on the paper. The colored pencil painting is also the palette. Very sharp pencil points create delicate color blends. Dull pencil points produce a color blend that is course in texture. Dry Brush Scumbling and BlendingThe method of mixing color by scrubbing or "scumbling" heavily overlaid colored pencil strokes into the surface texture of the paper using a Round Scrubber or Fabric Dye Brush. Using the stiff short bristles of a fabric dye brush, scrub the overlaid colored pencil strokes into the pitted surface of the paper. This timesaving technique effectively blends the colors without burnishing. Colors can then be overlaid onto or erased from a scumbled surface. Why do I recommend a vellum surface paper? A plate finish paper has a smooth surface and will become saturated with color quickly. A glasslike slick quality will developed more rapidly on a plate or smooth finished paper. The ability to add more color will become difficult because there will be no more texture on which to catch and hold your colors. If you cannot add color because your surface texture has become saturated with color, you can do a crosshatching effect with your retractable pen knife tip making a texture on which you can continue doing color overlays for a brief time. Test this before you apply it to your colored pencil painting to see the results. (Click Image For Larger View) 
BurnishingBurnishing is used to create dense color saturation and avoid the white stippling effect caused by the tooth or texture of the paper. Applying pressure with a drawing tool to compact the surface texture of the paper makes a smooth and shinny surface. Using colored pencils or the "Colorless Blender" pencil as a burnishing tool creates a wax build up, which causes the effect of drawing on a glasslike surface. Other blunt tools like the blending stump can be used to smear a heavy wax overlay into the paper surface. I choose to do some burnishing as a finishing touch to my artwork. You may choose to do dry brush scumbling to get smooth, rich and intense colors as an alternative to burnishing so you can do frequent color overlays and color blends without saturating the surface of the paper. To clean colored pencil residue out of the Fabric Dye Brush, dip it in denatured alcohol and wipe out residue on an absorbent cloth. (Click Image For Larger View) 
Hatching and Cross Hatching and TexturesA method of creating light and dark values and color blends using linear pencil or pen strokes. Colored pencil hatching strokes can be a means of mixing two or more hues to create color changes. Hatching: Parallel pencil strokes spaced close or widely apart. (Click Image For Larger View) 
Overlay Blending and Burnishing Example "Small Things" 
By Sheri Lynn Boyer Doty Blending Colored Pencils with SolventsSolvents Supplies
3 Clear blending markers: Three clear blending markers are needed for blending light, medium and dark colors Liquid solventsClear Turpenoid: Turpenoid is advertized as an odorless mineral spirit (Avoid Turpentine – it is toxic and contains lignin. Lignin can cause paper to deteriorate over time.) Used for blending, staining and smearing Odorless Mineral Spirits (Gamsol) - If you are allergic to Turpenoid this acts like Turpenoid but is considered to be less toxic because it does not evaporate into the atmosphere as fasDenatured Alcohol Hospital Strength 90+% Used for blending colors, cleaning fabric dye brushes, and refilling clear blending markers (Purchase at a hardware stores at 90 proof), or buy Hospital Strength Denatured Alcohol purchased directly from your pharmacy. Check the percentage of alcohol content before you purchase denatured alcohol. Anything lower than 90% is too weak. Old Terry Cloth Rag – Used to blot solvent from brushes, and for solvent staining techniques Blending with solventsBlending with solvents is a means to get color saturation without burnishing. It is a timesaving method for spreading color in a painterly fashion. Solvents dissolve or chemically change wax colored pencils – effectively softening them for easy blending. When liquefied, colored pencil overlays fill the valleys of the paper texture effectively eliminating the white stippling effect. This literally makes a toned paper underpainting eliminating the white texture. Papers of all types are affected differently by colored pencil and solvent applications. On papers with a non-porous surface, like Strathmore’s 500 series, 100% cotton vellum Bristol board, colored pencils blended with solvents can be erased, scraped off and restated again as needed offering color blending flexibility. Soft absorbent papers such as Revies BFK and watercolor papers absorb the solvent blended colors permanently into the paper. I suggest you experiment with different papers to see the affects you get from solvents and colored pencil overlays so you will be informed of the results before investing in a time intensive colored pencil painting. Note: Solvents can alter colored pencil hues. Liquid Solvent Blending StainingStaining Staining is a method of creating a solid color background or a multicolored under painting using a solvent. After applying thick strokes of colored pencil or art sticks to the paper, saturate a watercolor brush with solvent and spread the loaded brush over the colored pencil overlay. Using a little pressure, rub a terrycloth rag into the softened colored pencil overlay in circular motions to create a stain of color on the surface of the paper. Another method is to dip the cloth into the solvent and rub directly onto the color overlay. The stained paper can be used as a background or as an under painting. Draw over the stained paper or erase as needed. (Turpenoid is my preferred solvent for staining because it liquefies colored pencil strokes quickly.) (Click Image For Larger View) 
Staining Example "At the Ball Park" Family Portrait (Click Image For Larger View) 
Sheri Lynn Boyer Doty Wet Brush Blending – For a loose painterly effect, apply solvent with a round acrylic or watercolor brush. Work over colored pencil strokes spreading and dissolving the wax colors on the paper. 
(Click Image For Larger View) Damp Brush Blending – For a more controlled solvent application, use a Filbert brush. Dip a Filbert brush into the solvent and blot the brush onto an absorbent rag to soak up the excess solvent. Blend colors with dampened bristles over colored pencil strokes. The Filbert brush can be used in place of a clear blending marker. (Click Image For Larger View) 
Clear Blending Markers: Used for blending, smearing and creating textures. Clear blending markers provide a controlled means of dissolving colored pencils. As you rub overlaid colors with the marker, the pencil strokes break down into a blurring effect. The colors seem to smudge and blend in the area of the clear blending marker application. To replenish dry markers, fill pen reservoir with hospital strength denatured alcohol. Pull pen tip out and pour solvent in through a small funnel applicator. Colored pencils leave a residue on the marker tip that can stain other areas of the artwork. To prevent artwork from accidental blemishing, I use a new marker or have 3 markers – one each for light, medium and dark colors. Damp Brush Example "Amanda and Her Children" (Click Image For Larger View) 
Sheri Lynn Boyer Doty Clear Blending Markers Example "Julia" (Click Image For Larger View) 
Sheri Lynn Boyer Doty Click to View PART TWO of the Color Pencil Drawing DemonstrationVisit Sheri Lynn Boyer Doty
|
|||||||||||||||||
Drawing Lessons
Site Navigation |


